The below information is available in various places on the UCSD poster printing site, but this is my practical synthesis of it (with pictures). (These instructions are specific for Microsoft PowerPoint 2010 running on Windows 7.)
Preliminary step 1) Get a printing account.
Preliminary step 2) ONE dimension of your poster must be EITHER 36” OR 42”.
The machine doing the printing only has these two sizes of paper width. The other dimension does not matter.
Example dimensions that are okay:
36” x 50”
29” x 36”
42” x 100”
120” x 36”
Example dimensions that are not okay:
29” x 35”
43” x 50”
Etc.
Note: a poster for which BOTH dimensions are greater than 42” cannot be printed. Any poster with both dimensions 42” or less can be printed, but there will be no control over how the margins are handled, AND you must still print with ONE dimension set to either 36” or 42”. Best to set this up from the beginning, or modify your poster (PowerPoint file) before printing so that one dimension is 36” or 42”.
1) Log on to a computer with the correct drivers installed. (The links to the drivers are under the “Print Your Poster” menu option on that page.)
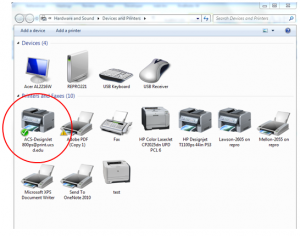
2) From the Start menu (button at bottom left of screen), select the “Devices and Printers” menu.
3) Right click on “ACS-DesignJet 800ps@print.ucsd.edu” and select “Set as default printer”:
4) From an internet browser, go to: https://sdacs.ucsd.edu/accttools-cgi-bin/rpauth.cgi
5) Log on with your printing account, and select one of the two “non-printing” printers. The “np” printer is for use if your poster has one dimension that is 36”, and the “np42” printer is for if your poster has one dimension that is 42”.
cplot1_np DesignJet 800ps located in apm-1426
cplot1_np42 DesignJet 800ps located in apm-1426
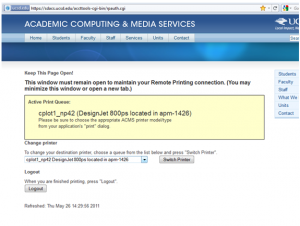
As stated on the site, this page must remain open for the duration of the following steps.
6) Open your poster in PowerPoint and click on the “File” menu (red arrow).
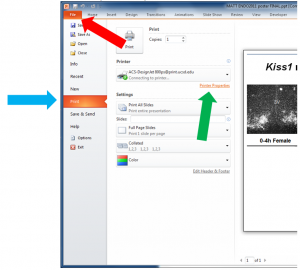
7) From the File menu, select “Print” (blue arrow).
8) Click on “Printer Properties” ONLY ONCE (green arrow).
Powerpoint will now be unresponsive for 5-10 minutes. WAIT. Clicking “Printer Properties” again will cause the wait time to increase, and will cause problems when multiple windows pop up after the long wait. It really does take 5-10 minutes, and can take as long as 20 minutes. Go have a coffee, read a book, do some experiments…
When you come back to the computer, you should see the Printer Properties window open:
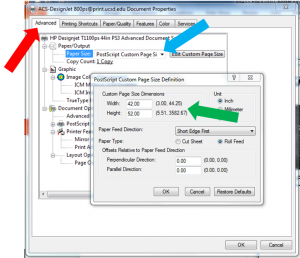
9) Click on the “Advanced” tab (red arrow).
10) From the “Paper Size” drop-down menu select “PostScript Custom Page Size” (blue arrow).
11) A new window should pop up called “PostScript Page Size Definition”. Here is where you enter your poster dimensions.
Note: the terms “Width” and “Height” here (green arrow) do not necessarily refer to your poster’s desired width and height. For our printer, “Width” refers to the dimension of your poster that is 36″ or 42″: put either 36″ or 42″ in the “Width” field. Put your poster’s other dimension in the “Height” field.
12) Click OK on the PostScript Custom Page Size Definition window.
13) Click on the “Printer Shortcuts” tab (red arrow).
14) Ensure that the poster diagram (blue arrow) has the correct orientation. As shown, this indicates a poster that you want to be wider (52″) than it is tall (42″). If my 42″x52″ poster was supposed to be taller (52″) than it is wide (42″), I would click directly on the poster diagram (blue arrow) once, such that the orientation is corrected.
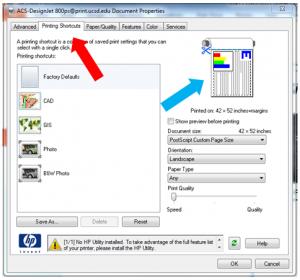
15) Click OK in the “ACS-DesignJet 800ps@print.ucsd.edu” window. (A warning window may pop up complaining about margin compatibility. Click OK to accept the default margin behavior.) This brings us back to the PowerPoint print page.
16) Click the “Print” button once. (Do not close PowerPoint after you’ve clicked “Print”.)
17) On an internet browser (while keeping the print login page open!), visit the page for the “non-print” printer you selected earlier.
36″ printer: http://cplot.ucsd.edu/~lp/cplot1_np/
42″ printer: http://cplot.ucsd.edu/~lp/cplot1_np42/
After PowerPoint sends the print to the printer (takes a minute or two), you should be able to see your print job listed by account number. A minute or so after the link appears, clicking it will take you to a rough image of your poster, as it would have appeared if actually printed. This image is poor quality, but is intended just to get an idea of if your margins were big enough, and if the general orientation and spacing is good.
18) If the test print image looks good, go back to the printer login page and select an actual printer from the drop down. Pick one of the available printer types, based on what paper you prefer, and on your 36″ or 42″ dimension.
I’ve used all of these paper types. Matte looks kind of strikingly minimalist and stark. High gloss has a lot of glare. Semigloss is what 99% of people use, and it looks great.
Select the actual printer you want to use (e.g. cplot1_sg42 or cplot1_sg36) and click “Switch”. Make sure your desired printer shows up in the yellow box on that page.
19) Go back to PowerPoint and click “Print” again. No need to re-enter all of the settings you’ve already set. (However, if you are printing multiple posters, you’ll need to go back to step 7 for each new poster.)
20) Go to cplot.ucsd.edu and enter your print account name. The next page should contain your newly sent print job. (You should also get an email notification of this.)
21) If you would like to check that ACMS has recieved your poster into their print queue, give them a call at 858-534-4097 and tell them you just sent a job and wanted to make sure it was received.
22) Once the poster has printed, you will receive a “plot job complete” email. The poster may be picked up in AP&M 1426.
nice. this is very helpful. the acms website is a disaster
Posted by corey on June 25th, 2013.
Glad it’s still helpful! I don’t know if/when ACMS will change anything with their poster plotters, but if anyone tries these directions and they don’t work: shoot me an email so I can update the instructions.
Posted by Dan on June 25th, 2013.
Downloaded these instructions today to print a poster.
Thanks Dan.
Posted by Dana on February 2nd, 2015.
[…] Dan Clark has excellent instructions on how to print through ACMS. […]
Posted by Poster Resources | UC San Diego Faculty Mentor Program on May 11th, 2016.